SinfulColors Gorgeous really is gorgeous.
It's a frosty bright blue, that requires 2 coats for full opacity. It applies very evenly but is a bit sheer in one coat. My bottle happened to have a somewhat deformed brush, but it is still usable, and is not a usual occurrence. When you are applying be sure to use even straight stroked and make your coats fairly thin because it may show brush lines if applied to heavily.
First two photos are of the deformed brush:
As you can see it is wide and flat because of the bristles breaking out the side of the stick. This is not normal, and the only time I have ever run into this issue in any polish.
And this is what the bottle looks like, in the bottle it looks darker than it really is.
And here it is applied, two coats, and a quick dry top coat.
I plan to buy this again when I see it again so I can have plenty and not worry about running out.
Showing posts with label blue. Show all posts
Monday, January 20, 2014
Saturday, December 14, 2013
Shopping Spree on November 30th!
Yep. Spent over 40 dollars at Sally Beauty on stuff for myself and for gifts. As well as a few dollars on stuff at Rite Aid for myself. Most of the "stuff"? I'm not saying it was nail polish... but it was nail polish. As a side note because I spent so much at Sally I got a free flat iron. Which I might never use becasue curling with it is a pain and my hair is pretty durn flat/straight anyway. MOVING ON!
Sally now carries OPI. HOORAY! But it is still like 8 bucks a bottle. So the four I got are probably the only four I will get for a looong time. But they are so pretty! The first paint job I did with the new polishes was using the dark blue OPI and stamping a lighter blue atop it and it was gorgeous:
This is OPI Incognito in Sausalito as a base with Sally Hansen Xtreme Blue Me Away for the stamps. I love the deep blue of the OPI. I can't begin to tell you HOW MUCH love I have for it.
The next paint job was a gradient, or ombre if you wanna use fancy talk, using two OPI colors. I have three pictures to share:
First you make a mess here....
Then you make a BIG mess on your fingers!
And finally! BEAUTY!
This was done with OPI Teal the Cows Come Home and OPI Purple with a Purpose. Both are beautiful colors and both are great to work with in a gradient! I have not used the fourth OPI yet or any of the polishes I got form Rite Aid. All in due time though... all in due time.....
Sunday, September 22, 2013
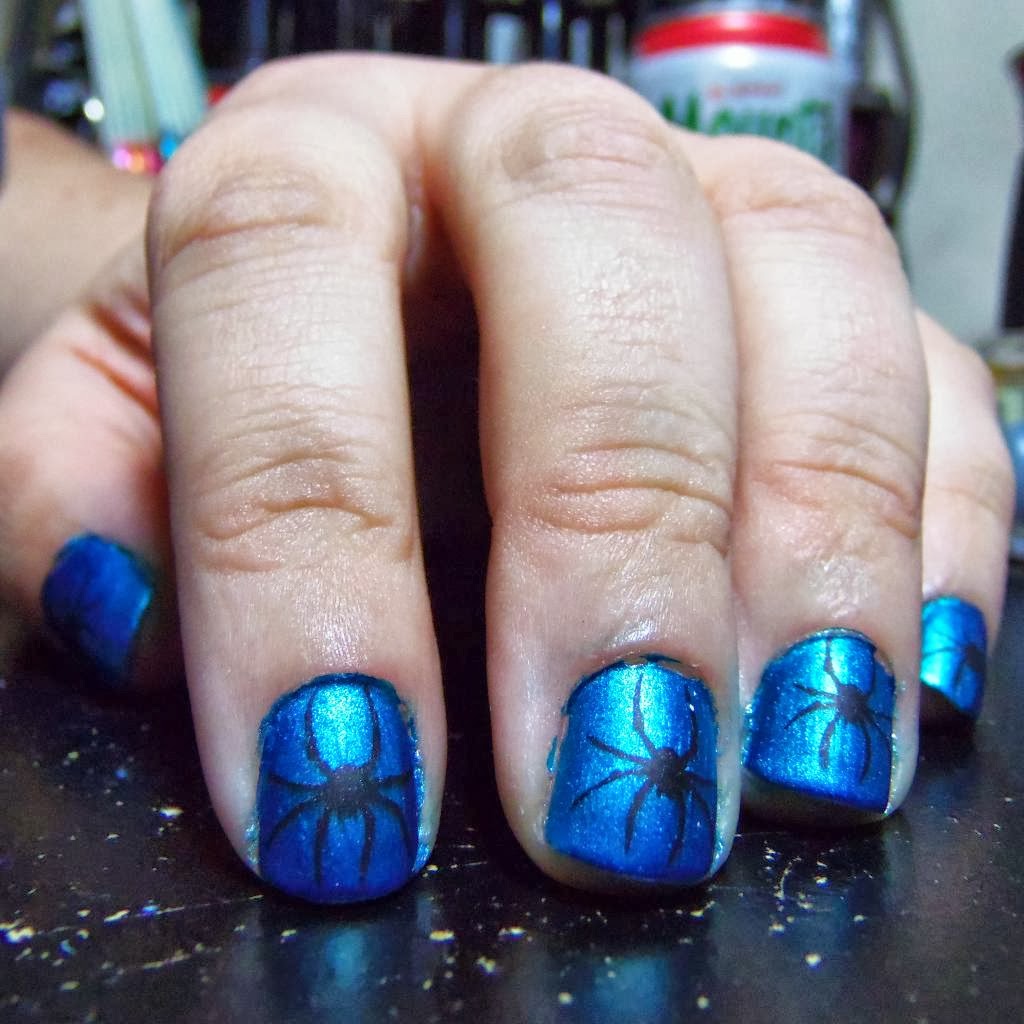
Day 22: Inspired by a Song, Boris the Spider.
First off, I was looking forward to this, I had so many song ideas and then I decided on a song that has a nostalgic good-feely memories. It's "Boris the Spider" by The Who. When I was in 5th grade my teacher would take any toy a kid had out during class and hold it for the day. At the end of the day he would get on the over head projector and have his plastic tarantula "eat" the offending toy and it would be returned to the kid as we were leaving to go home. While the spider was having it's meal he would play "Boris the Spider" on a little boombox. That teacher was easily one of my favorite teachers ever. He was a cool dude.
For the nails I used a base of KleanColor Metallic Aqua (cuz I like blue) then stamped with KleanColor Metallic Black. I WAS gonna stamp with PureIce Black Out but I didn't like how it looked so I switched to my only other black. I finished off with a matte top coat which helped bring out the spiders, since metallic stamps tend to blur into metallic backgrounds. However my matte top coat isn't super great quality.
RESULTS:
I like how they turned out. Not super fantastic but still pretty awesome.
And for reference The song:
For the nails I used a base of KleanColor Metallic Aqua (cuz I like blue) then stamped with KleanColor Metallic Black. I WAS gonna stamp with PureIce Black Out but I didn't like how it looked so I switched to my only other black. I finished off with a matte top coat which helped bring out the spiders, since metallic stamps tend to blur into metallic backgrounds. However my matte top coat isn't super great quality.
RESULTS:
I like how they turned out. Not super fantastic but still pretty awesome.
And for reference The song:
Saturday, September 21, 2013
Days 19 & 20
I have a galactic fail and a pretty water marble to share this morning. My attempt at galaxy nails for the first time went over pretty badly mainly because it all wound up blue on accident. I will try again some time in the future and try to avoid the blue fiasco. Maybe I will have a good glitter to use then too.... anyway here it is:
Very, very pleased with this one and will keep it most of today as well (day 21) but will change it later after my day is mostly over. And for now I need to sleep, my niece is having a birthday party at one and I need to sleep before I attend.
NIni every one!
I used a black base with three or four colors forthe galaxy/nebula bits and they looked good then I went to add a top layer of a glitter aaaand because I didn't check it first to be sure it turned out it wasn't a clear base but a blue sheer one.... whoopsies. It's not totally awful but I still really dislike it.
And my water marble I was super happy with. I did a dry water marble, using More Nail Polish's method. I used Salon Perfect Baby Blues fro my main color and Sally Hansen Xtreme Wear Blue Me Away for the marble. The result is as follows:
NIni every one!
Monday, September 16, 2013
Day 16, Tribal
So this was more fun and less stress than I thought it would be. I did a google search for "simple tribal nails" to get inspiration because I don't trust my ability to do complicated tribal styles. Anyway I found a couple and then had a bit of fun. Here is the result:
First was a base coat, then the base color which is Wet-n-Wild Wild Shine Bijou Blue, two coats. The green stripe came next, took three layers of that to get the contrast I wanted, it is Wet-n-Wild Wild Shine Caribbean Frost. After they were dry I used a So Easy Stripe Rite Nail art bottle/brush for the lines. Finally used Pure Ice Black Out and a dotting tool for the dots. Topped with Seche Vite.
I lovelovelove how it turned out for my first try! Very happy. Yep.
How's everyone else's challenge month going so far?
First was a base coat, then the base color which is Wet-n-Wild Wild Shine Bijou Blue, two coats. The green stripe came next, took three layers of that to get the contrast I wanted, it is Wet-n-Wild Wild Shine Caribbean Frost. After they were dry I used a So Easy Stripe Rite Nail art bottle/brush for the lines. Finally used Pure Ice Black Out and a dotting tool for the dots. Topped with Seche Vite.
I lovelovelove how it turned out for my first try! Very happy. Yep.
How's everyone else's challenge month going so far?
Days 14&15, Floral and Delicate.
So once again time got away from me. So I doubled up. Flowers and delicate in one paint job. Hooray for work ethic! Or cutting corners ya know whatever works.... Anyway here they are:
I started with a none too fancy base coat, then used Salon Perfect Baby Blues for the base color and stamped with Sally Hansen Xtreme Wear Lacey Lilac, topped with Seche Vite. The stamp plates were Mash-42 for the fingers and Mash-40 on my thumb. As you can see I am picking at and chewing my thumb a lot again... sorry for the unsightliness of it.
The Lacey Lilac was pretty bad for stamping with it wanted to stick to the stamper when I needed it to transfer to my nails, resulting in my rocking the stamper which smeared it a bit on my index and middle fingers. It also resulted in incomplete stamp transfer in other areas but my index and middle finger bugged me the most. So probably won't be using it for stamping again. Which is sad because it is very pretty.
Honestly? I only painted the one hand due to being so cranky with the stamping failure. :C
Anyway, look forward to my tribal later today, it turned out pretty rad for my first try at tribal prints! 8D
I started with a none too fancy base coat, then used Salon Perfect Baby Blues for the base color and stamped with Sally Hansen Xtreme Wear Lacey Lilac, topped with Seche Vite. The stamp plates were Mash-42 for the fingers and Mash-40 on my thumb. As you can see I am picking at and chewing my thumb a lot again... sorry for the unsightliness of it.
The Lacey Lilac was pretty bad for stamping with it wanted to stick to the stamper when I needed it to transfer to my nails, resulting in my rocking the stamper which smeared it a bit on my index and middle fingers. It also resulted in incomplete stamp transfer in other areas but my index and middle finger bugged me the most. So probably won't be using it for stamping again. Which is sad because it is very pretty.
Honestly? I only painted the one hand due to being so cranky with the stamping failure. :C
Anyway, look forward to my tribal later today, it turned out pretty rad for my first try at tribal prints! 8D
Wednesday, September 11, 2013
Day 11, Polka Dots
I am not a super fan of dots, mostly because I can never get them spread out evenly when I want them to be. So I was expecting today to be super annoying to get done. Well I was wrong thank goodness! I did a simple "dotted tips" design and I love how it turned out.
The two colors I used were SinfulColors Opening Night for the base color and then SinfulColors Gorgeous for the dots. I almost used SinfulColors Rich in Heart for the dots but decided I wanted something lighter and more complementary to the base color. Rich in Heart is a very dark red. To top it all off I used Seche Vite, which, unlike some top coats I've used that make some colors fade into each other, actually made them contrast more. Which was great, the more I use it the more I see why people are so crazy for Seche Vite.
And as a crazy random bonus my nails look really nice with my 3DS!
The two colors I used were SinfulColors Opening Night for the base color and then SinfulColors Gorgeous for the dots. I almost used SinfulColors Rich in Heart for the dots but decided I wanted something lighter and more complementary to the base color. Rich in Heart is a very dark red. To top it all off I used Seche Vite, which, unlike some top coats I've used that make some colors fade into each other, actually made them contrast more. Which was great, the more I use it the more I see why people are so crazy for Seche Vite.
And as a crazy random bonus my nails look really nice with my 3DS!
Tuesday, September 10, 2013
Day 10, Gradient!
I was originally gonna use just China Glaze Get Outta My Space and China Glaze Strap On your Moon Boots to make a pink to blue holographic gradient, they sponged on so sheer I knew I would be there forever to get the opacity I like. SO I went for two colors I KNOW make a spectacular gradient. KleanColor Metallic Pink and KleanColor Metallic Sapphire. I used them as a base and got the opacity I wanted then used just China Glaze Get Outta My Space for a sheer holo top coat applied via the cosmetic sponge I had done the regular gradient with.
What wound up happening was the China Glaze "top coat" made the vibrant base colors more dusty and added the holographic sheen I was hoping for! It is SUPER pretty even in low light when you can't see the holo effect.
Here it is indoors under my desk lamp:
You can see a hint of the holo effect but not much. Because I do my nails almost exclusively at night I had to wait until I woke up this morning to see how they fared under sunlight. I wasn't disappointed. Unfortunately my camera or my skills as a photographer are not well suited to catching the rainbow. So I have a picture and a brief video to share to try and show the beauty.
And for reference this is a gradient I did months ago with the same base colors minus the holo topping.
Over all? I am gonna be super sad to remove this for tomorrow's prompt.
What wound up happening was the China Glaze "top coat" made the vibrant base colors more dusty and added the holographic sheen I was hoping for! It is SUPER pretty even in low light when you can't see the holo effect.
Here it is indoors under my desk lamp:
You can see a hint of the holo effect but not much. Because I do my nails almost exclusively at night I had to wait until I woke up this morning to see how they fared under sunlight. I wasn't disappointed. Unfortunately my camera or my skills as a photographer are not well suited to catching the rainbow. So I have a picture and a brief video to share to try and show the beauty.
And for reference this is a gradient I did months ago with the same base colors minus the holo topping.
Over all? I am gonna be super sad to remove this for tomorrow's prompt.
Labels:
31 day challenge,
31dc2013,
blue,
China Glaze,
day 10,
gradient,
holo,
holographic,
kleancolor,
nail polish,
nails,
pink
Thursday, September 5, 2013
Day 5: Blue!
So the first thing I did was try the dry water marbling on my right hand. And it worked pretty good except my very first try I messed up royally. "Oh it should be dry now -yank- Oh crud ALL the polish came off WITH the plastic...." Kinda a reverse of what was supposed to happen. So I tried again and it worked better I just had to patiently sit a while and watch and episode of Empires. Here is the result:
Once again it's an epic mess. I am getting lazier and lazier as this challenge goes on and it's only day five... BUT IT'S STILL PRETTY!
My other hand I went a different route....
Gradient!
I love how it turned out.
Yes there are days specifically for gradients and Water Marbles but I havent done either in so long, and seeing them on the list was taunting me.
I'm easily taunted.
Also blue is my favorite color ever so I had to so some thing special.
Sinful Colors Hot Spot and Sally Hansen Xtreme Wear Blue Me Away
Once again it's an epic mess. I am getting lazier and lazier as this challenge goes on and it's only day five... BUT IT'S STILL PRETTY!
My other hand I went a different route....
Gradient!
Sinful Colors Gorgeous on all fingers.
Sinful Colors Opening Night on thumb and Sinful Colors Hot Spot on the rest.
I love how it turned out.
Yes there are days specifically for gradients and Water Marbles but I havent done either in so long, and seeing them on the list was taunting me.
I'm easily taunted.
Also blue is my favorite color ever so I had to so some thing special.
Friday, May 3, 2013
Gradient Nails
I followed this tutorial for my first try and doing a gradient paint job. And it turned out pretty dang well. I can't stop staring at my nails now.
I've also been stressing and that triggered my finger chewing habit... so sorry for my rough looking fingertips.
Anyway here is the gradient I dun:
I really like how the colors I chose came out.
And with a new month comes money and a new desire to buy nail polish.... must... resist.... xD
Until Next Time!
I've also been stressing and that triggered my finger chewing habit... so sorry for my rough looking fingertips.
Anyway here is the gradient I dun:
I really like how the colors I chose came out.
And with a new month comes money and a new desire to buy nail polish.... must... resist.... xD
Until Next Time!
Subscribe to:
Posts (Atom)